![SkyTrak_Logo-1000.png]](https://resources.skytrakgolf.com/hs-fs/hubfs/SkyTrak_Logo-1000.png?height=22&name=SkyTrak_Logo-1000.png)
1. Create your SkyTrak account
-Navigate to https://clubhouse.skytrakgolf.com
-Click "Create Account"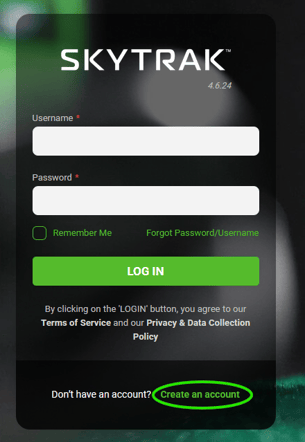
-Enter your details
*Make sure you use a username that is unique to all other players (not just a first name)
Once you've gone through the process, you will receive a code by email to verify your email address. After which you will log in with your newly created credentials.
2. Register your SkyTrak unit
- Go to https://clubhouse.skytrakgolf.com/login and Log in or Create an Account.
- Select My Device from the menu on the left.

- Input the SN (ESN) number located on the bottom of your SkyTrak Device. *

ESN starts with:
SkyTrak OG: RE
ST+: RF
ST MAX: RG
* Zero and the letter O look very similar. - Verify the information and select Submit to complete the registration of your SkyTrak Device
*If you don't see your device listed after pressing "Submit", refresh the Clubhouse webpage.
Troubleshooting:
-Check the outer box
The box the SkyTrak unit comes in has the serial number on a sticker on the outside. This can be easier to read.
-Device does not belong to user or family
Make sure the unit is not tied to any duplicate or family accounts. You can enter alternate email addresses HERE to see if you have any duplicate accounts.
-ESN Not Recognized
Try "ohs" in place of zeroes and vice versa.
The last digit on a SkyTrak+ serial number is always a U, K, or S (not a five).
3. Apply your Membership (if applicable)
Prepaid membership cards are delivered by email, shortly after your order confirmation. This secondary email is automated, and may be filtered as spam or a marketing email. Prepaid codes are only sent with orders placed through skytrakgolf.com, as opposed to orders placed through your Clubhouse account.
The email is sent from info@skytrakgolf.com with the subject line Your Prepaid Code is ready. Purchases that include codes from Value Added Retailers come from varying emails. SkyTrak support can not dispense codes purchased from an alternate retailer. One must reach out to their respective customer service teams if they don't have a code.
Steps to Activate your SkyTrak Membership using your Activation Card
On Desktop:
-
Visit https://clubhouse.skytrakgolf.com/login and login to your account.
- Choose Apply Prepaid Membership Card on the right hand side
- Input the 9 character code, including a hyphen after the 3rd and 6th character, into the space and select Submit Code when highlighted.
-
- eg. XXX-XXX-XXX instead of XXXXXXXXX

On mobile:
-
Navigate to clubhouse.skytrakgolf.com and log in.
-
Select "My Devices" from the navigation bar on the bottom of the screen.

-
Click the ellipses at the top right of your device panel.
-
Select "Change Plan"

-
Click "Apply Prepaid Membership Card"

You should receive a confirmation that the code was accepted. Select OK, and you should see your membership listed on your account.
*Note: Some free membership offers activate automatically upon registration, without the need for a code. Refresh the clubhouse webpage after registering and check whether your expected membership is applied if you're not sure you have a code.
4. Install the SkyTrak app
-
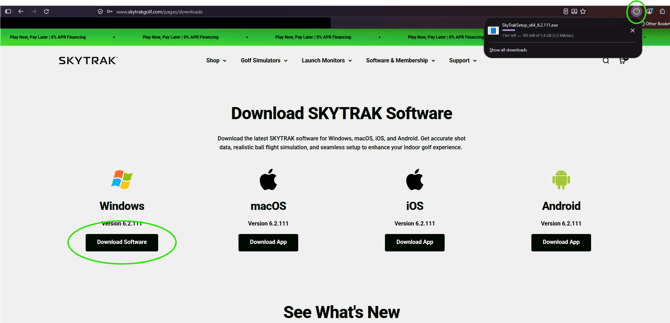
Navigate to https://skytrakgolf.com/downloads
-
Click "Download Software" under your desired version and platform
-
When the download progress bar finishes, click the file name or "Open File"
-
Click Yes, Next, and Install
-
Return to your Desktop, and double-click the ST icon
5. Connect your SkyTrak unit
Direct Mode
1. Click the "Connection Hub" button on the top right of the SkyTrak application
2. Select which model of SkyTrak Launch Monitor you are connecting, then click "Next" at the bottom right corner of the screen. 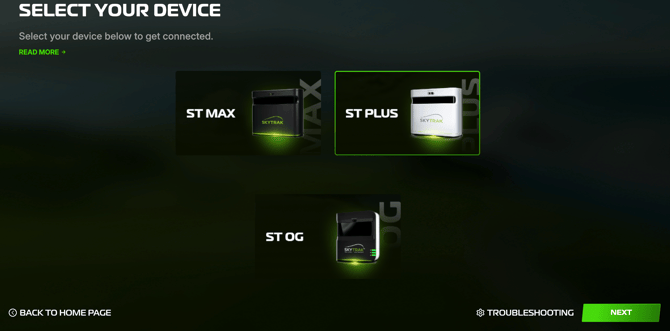
3. Indicate whether you are trying to use a wireless or wired connection, then click "Next" at the bottom right corner of the screen.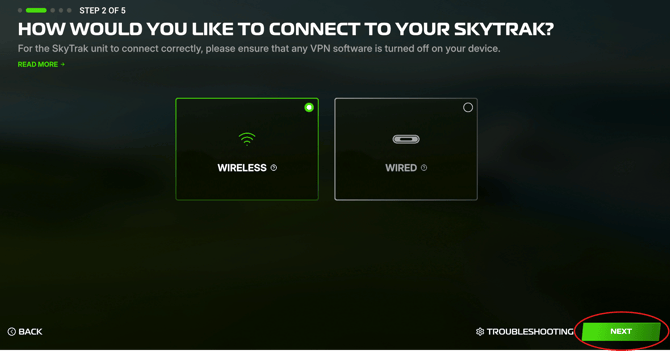
4. Connect your PC or iPad to your SkyTrak Launch Monitor's network.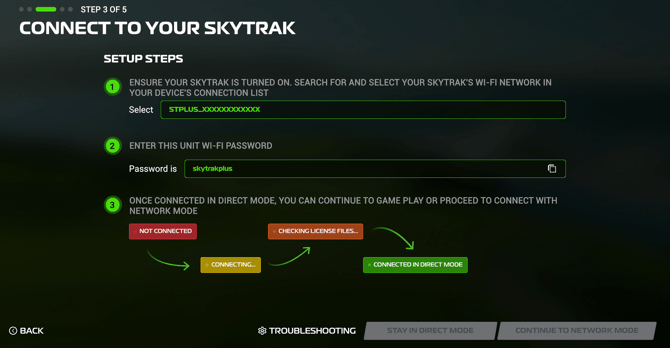
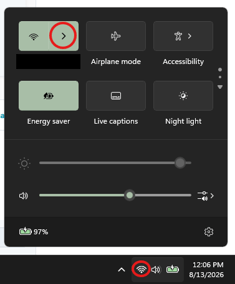
On a Windows PC, you may press your Windows Key  or ESC
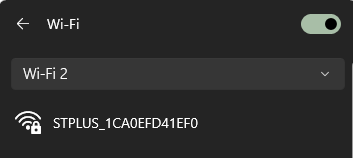
 to window the application, and click the WiFi icon on your taskbar. Click the arrow pointing to the right next to the WiFi symbol to open your available networks list. Click the relevant WiFi network and select "Connect". You will then be prompted for the password.
On an iOS device, navigate to your Settings application and press "WiFi". Click the relevant WiFi network, and you will be prompted for the password.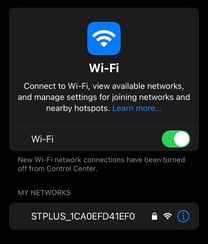
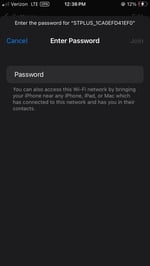
The password for the STMAX WiFi network is skytrakmax
The password for the STPLUS WiFi network is skytrakplus
There is no password necessary for the SKYTRAK WiFi network
Within 30 seconds it should say "Connected in Direct Mode" in the top right corner. You may press "Stay in Direct Mode" if you plan to utilize this connection mode to play. Click "Continue to Network Mode" if that connection mode is your ultimate goal.
Troubleshooting:
Windows
iOS
MacOS
Network Mode
1. Follow the directions above for Direct Mode
2. After clicking "Continue to Network Mode" your SkyTrak will start scanning for nearby networks automatically. Click your home network name to highlight it, then select "Next" on the bottom right.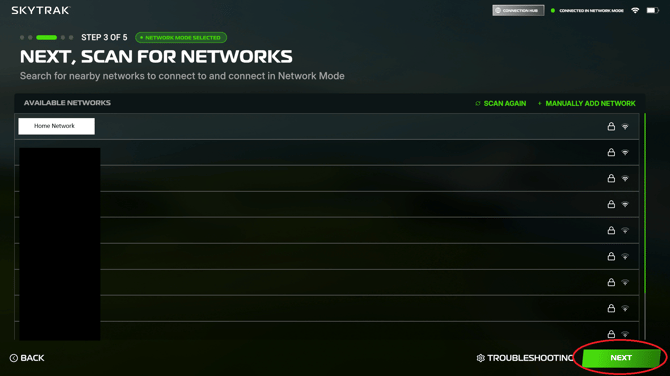
3. Enter your home network password in the password field, then press "Next" at the bottom right.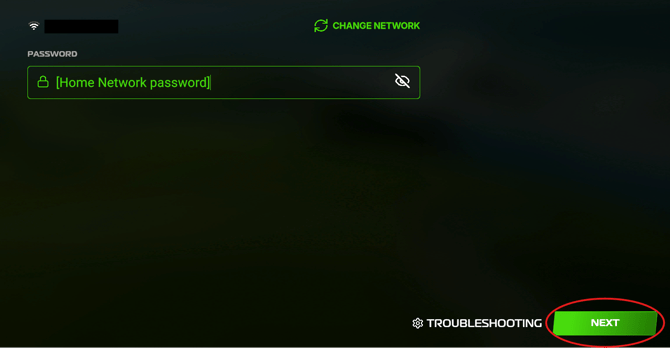
4. The indicator in the top right will show "Not Connected" for up to 30 seconds. Once it changes back to "Discovering" double-check that your PC or iPad is now back on the same home WiFi network you chose on the previous page. It should connect within 60 seconds.
Troubleshooting:
If your device is staying on Green-Yellow-Red for more than 30 seconds after the indicator goes back to "Discovering", reboot the unit. If it goes back to green-red-red, the most likely cause is that the home network password was typed incorrectly. From there, you can simply reconnect to the STPLUS/STMAX WiFi network, and re-type the password to try again. If the SkyTrak network goes back to green-yellow-red after a reboot, and it's still not connecting:
-Double check that your PC/iPad is connected to the same SSID you chose in the network scan.
-Restart the application.
-Power cycle your SkyTrak unit.
-Turn the SkyTrak off, reboot your home router, then turn the SkyTrak unit back on.
On Windows, you can always press the Windows Key on the bottom left of your keyboard to bring up your taskbar and WiFi icon, where you can check which network you're connected to.
(MacOS and iOS) If after this point you find that the connection indicator cycles between "Connecting" and "Not Connected", the local network permissions may need to be enabled for the SkyTrak Application.
-iOS
-MacOS
(MacOS) if you've tried these steps and the indicator never switches from "Discovering", follow this process:
-Uninstall the application completely by using AppCleaner
-After downloading the installer, drag the application to the "Applications" folder in Finder before launching
The other reason you may see this is because there is another instance of the SkyTrak application open in the background on another device. If you have the application installed on another platform, please make sure it is completely closed.
USB Mode
USB Mode will allow SkyTrak Launch Monitor to connect to your PC/Laptop without needing a Network that can sync your data automatically.
The following steps need to be done with your SkyTrak Launch Monitor OFF:
*Please use the cable that came with your SkyTrak Launch Monitor or a data transmitter.
Original SkyTrak
- The micro-USB ends go into the SkyTrak, bellow the power button, the USB portion going into your device.
- Once they have been connected you will notice the bottom light in your device turn yellow, this is normal.
SkyTrak Plus:
*While this process will keep the unit charged while actively in USB mode, the cable must be switched to the included USB-C to USB-C cable for an overnight charge.
1: Plug SkyTrak + splitter cable into SkyTrak + underneath the dust cover.

2: Plug the "Power only" USB-C cable into the provided AC power adapter. Wait for Yellow/Amber power light.


3: Power on SkyTrak +. Wait for Green/Red/Red 
4: Plug "PC' USB-A cable into your PC.

5. Once you log in, your SkyTrak + will automatically connect to the SkyTrak software and will show the following.
(Green/Green/Red) = Checking License Files
(Green/Green/Green) = Connected


Troubleshooting
Remove the "Power Only" end of the splitter cable from the AC adapter, so that only the "PC" and "ST+" ends are plugged in. Turn the unit off. You should see the power light turn yellow once the unit is shut down. If you don't, try a different USB port on the PC until you do. Once complete, repeat the above process with the USB port that enabled the yellow LED.
If you are on an older version of the SkyTrak software, please review THIS ARTICLE