Pulling up, finding and navigating the player/student/member search page
Searching for a Student
- Open CRM Dashboard under Coach Tools and select the Player tab if it is not already.
- Input keywords for a Student Profile using 1 or more of 5 types of information in the Search Bar: WUCI, Player ID, name, email address, or phone number (click here for additional details on keywords).
- Narrowing Down the Search
- In both the CRM Dashboard and Schedule Book, you can narrow down the student search by clicking on the drop down menu next to the search bar.
- This will bring down the below list:


- This will bring down the below list:
- There is an Advanced Search option available in the CRM Dashboard.
- In both the CRM Dashboard and Schedule Book, you can narrow down the student search by clicking on the drop down menu next to the search bar.
- Search for the Account
- Click on Search either next to the Search Bar or at the bottom of the Advance Search Options box.
- This will populate the Student list with all of the results that fit within your search parameters.
- If you are in CRM and your search does not return any results, you will receive a notification pop up that says "[Search Parameters] is not found. Do you want to add this player?" and you will be given the options of Yes or No.
- If you are in Schedule and your search does not return any results, it will show a "No Players to Show" message but will not give you the option to add that player.
Examining the Search Results
- Reading the Results
- The results will show up in a list format.


- At the top are the column titles with the search results below in rows of alternating white and off-white (Click here to see how to customize your columns).
- You can organize these results by clicking on the column title to sort the rows alphabetically/chronologically in either Ascending or Descending order.
- Ascending Order will show an

 icon next to the column title you're organizing by.
 - Descending Order will show an

 icon next to the column title you're organizing by.
- Ascending Order will show an
- Note that there is a different column for ID and WUCI. Both act in the same manner as only one account will be matched to a WUCI or an ID.
- The practical difference between these two numbers is that the WUCI can be used as a username in the Clubhouse while the ID cannot.
- Last Contacted is the date and time that an email was last sent to the student from the automated system, or a note was added regarding a phone call between the student and a GOLFTEC TEAM member.
- In the screenshot above, you will notice a Japanese flag next to the second result. That indicates that they are taking lessons in Japan. Only the students in Japan will have a flag next to their name. All others will be listed as just a name.
- The Center and Coach columns will show the center and coach that the student most recently had a lesson with and where their account is currently defaulting.
- Students can change this in the Clubhouse if they would like to go back to their old coach/center, but we cannot change this in their profile.
- The results will show up in a list format.
- The Action Column
- Not shown in the screen shot above is the Action Column.
- The Action Column is listed to the right of Coach or Last Lesson, depending on what information you have left visible and whether you are in CRM or Schedule Book.
- It contains a variety of icons that link to different options within the Clubhouse, and the icons vary based on whether you are in CRM or Schedule Book.
- CRM Action Column
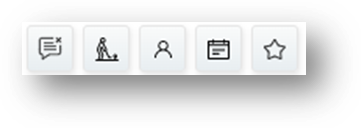


 Will open the Message Center for the selected Student.
- The Message Center gives options for sending premade emails, seeing what emails have been sent, and adding notes to Student accounts.

 Will open a separate tab in your browser and directly open the Student's Clubhouse.
- For more information on the GOLFTEC Clubhouse, check out the Clubhouse on Browser and Clubhouse on App sections.

 Will open the Student's Profile
- For more information on Student Profiles, see the Student Profile KB Article.

 Will open a tab of the schedule book of their center to quickly book a lesson for them.
 Adds the student to your PIN Sheet
- CRM Action Column
General notes:
-
- You can have multiple Student Profiles open simultaneously and switch between them by clicking on the Student's name.
- The selected profile will have a green bar underlining it.
- When you are done with a profile, you can close it by clicking the

 icon to the upper right of the name.